
Springtime brings a joyous hustle in the kitchen, especially when it comes to creating delightful desserts. This No Bake Easter Egg Cheesecake is truly special—hiding a creamy chocolate filling inside a playful chocolate egg shell! It’s not just indulgent but also incredibly easy to whip up, making it a favorite activity for both kids and adults alike. With a scrumptious biscuit base and plenty of room for customization, you can decorate it with your favorite treats for a personalized touch. Best of all, there’s no oven required, so you can skip the heat and focus on the fun. Are you ready to bring a sweet surprise to your Easter table?

Why is this Easter Egg Cheesecake a must-try?
Uniqueness: This No Bake Easter Egg Cheesecake transforms a traditional favorite into a delightful showstopper.
Kid-Friendly: Perfect for children to help with, turning dessert-making into a joyous event.
Customizable: Go wild with decorations—mini eggs, chocolate bunnies, or your favorite treats.
Simplicity: Only a handful of ingredients, plus no baking involved, makes it accessible for all skill levels.
Crowd-Pleaser: With its stunning presentation and delicious taste, it’s bound to impress guests at any gathering! After you try this cheesecake, don’t forget to check out our Pistachio Mushroom Cheesecake for another impressive treat!
Easter Egg Cheesecake Ingredients
• Here’s everything you need to create your Easter Egg Cheesecake masterpiece!
For the Cheesecake Filling
- Full fat cream cheese (235g) – Provides the rich, creamy filling; low-fat versions can make it looser.
- Icing sugar (40g) – Sweetens the filling; use a sugar alternative for a lower-calorie option.
- Vanilla extract (1 tsp) – Enhances flavor; feel free to swap for other extracts like almond if desired.
- Double cream (95ml) – Adds a rich texture; consider whipping cream for a lighter option.
For the Base
- Digestive biscuits (60g) – Forms the tasty base; replace with gluten-free biscuits for a celiac-friendly option.
- Butter or baking spread (25g, melted) – Binds the biscuit crumbs together; margarine can be used as a substitute.
For the Easter Egg Shell
- Large Easter egg (approx 150g) – The delightful shell for the cheesecake; ensure quality to hold the filling.
For Decoration
- Dark chocolate (15g, melted) – Adds a decorative touch and rich chocolate flavor; white or milk chocolate also works well.
- Mini eggs and Kit Kat bunnies (optional) – Fun, festive toppings; mix in other seasonal candies as you like!
Dive into this Easter Egg Cheesecake, and elevate your holiday celebration with a treat everyone will adore!
Step‑by‑Step Instructions for Easter Egg Cheesecake
Step 1: Prepare Easter Egg
Start by warming a sharp knife under hot water, then drying it with a towel. Carefully slice the large Easter egg in half along its seam, ensuring smooth, even cuts to create two intact halves for your cheesecake. Set the egg shells aside while you prepare the base.
Step 2: Make Biscuit Base
Crush the digestive biscuits into fine crumbs, either using a food processor or placing them in a plastic bag and smashing them with a rolling pin. In a mixing bowl, combine the biscuit crumbs with the melted butter until the mixture resembles wet sand, ensuring full incorporation to form a sturdy base.
Step 3: Form Base
Press the buttery biscuit mixture evenly into the bottom of the Easter egg halves, using your fingers or the back of a spoon to compact it firmly. Once the base is set, place the egg halves in the refrigerator for about 30 minutes, allowing the base to chill and harden.
Step 4: Prepare Cheesecake Filling
In a large bowl, beat together the cream cheese, icing sugar, and vanilla extract until it reaches a smooth and creamy consistency. Next, gently fold in the double cream, mixing until the filling thickens slightly—this should take about 3-5 minutes to achieve the right texture for your Easter Egg Cheesecake.
Step 5: Fill Egg Halves
Carefully spoon the creamy filling into the chilled egg halves, spreading it evenly and smoothing the tops with a spatula. There should be a generous layer of cheesecake filling in each half, creating a luscious backdrop for the festive decorations. Return the filled egg halves to the fridge for at least 2 hours to set nicely.
Step 6: Decorate
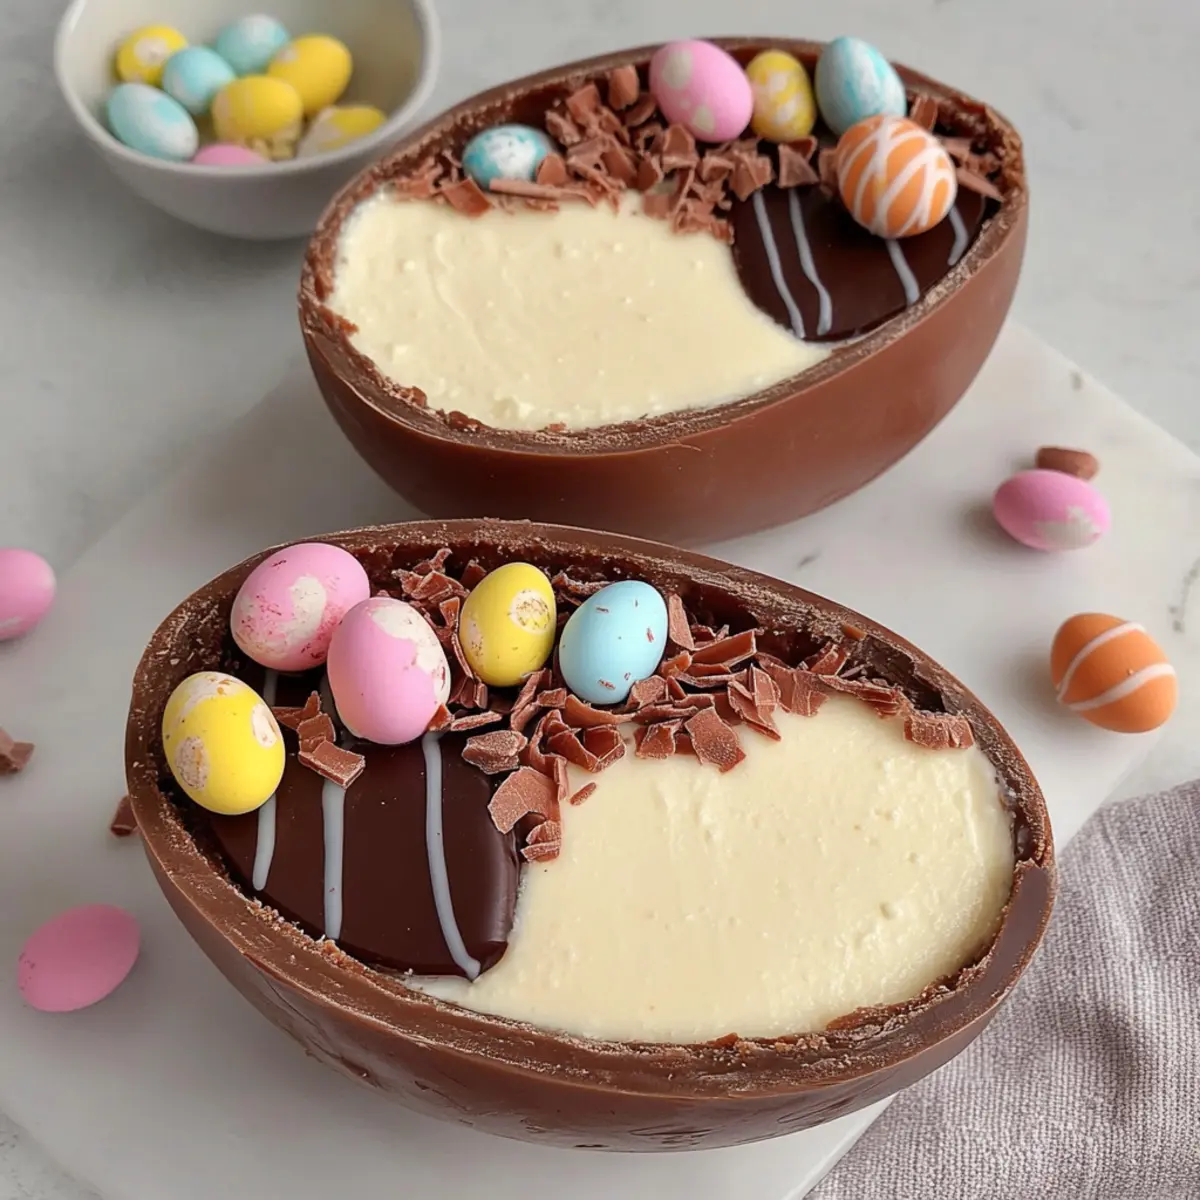
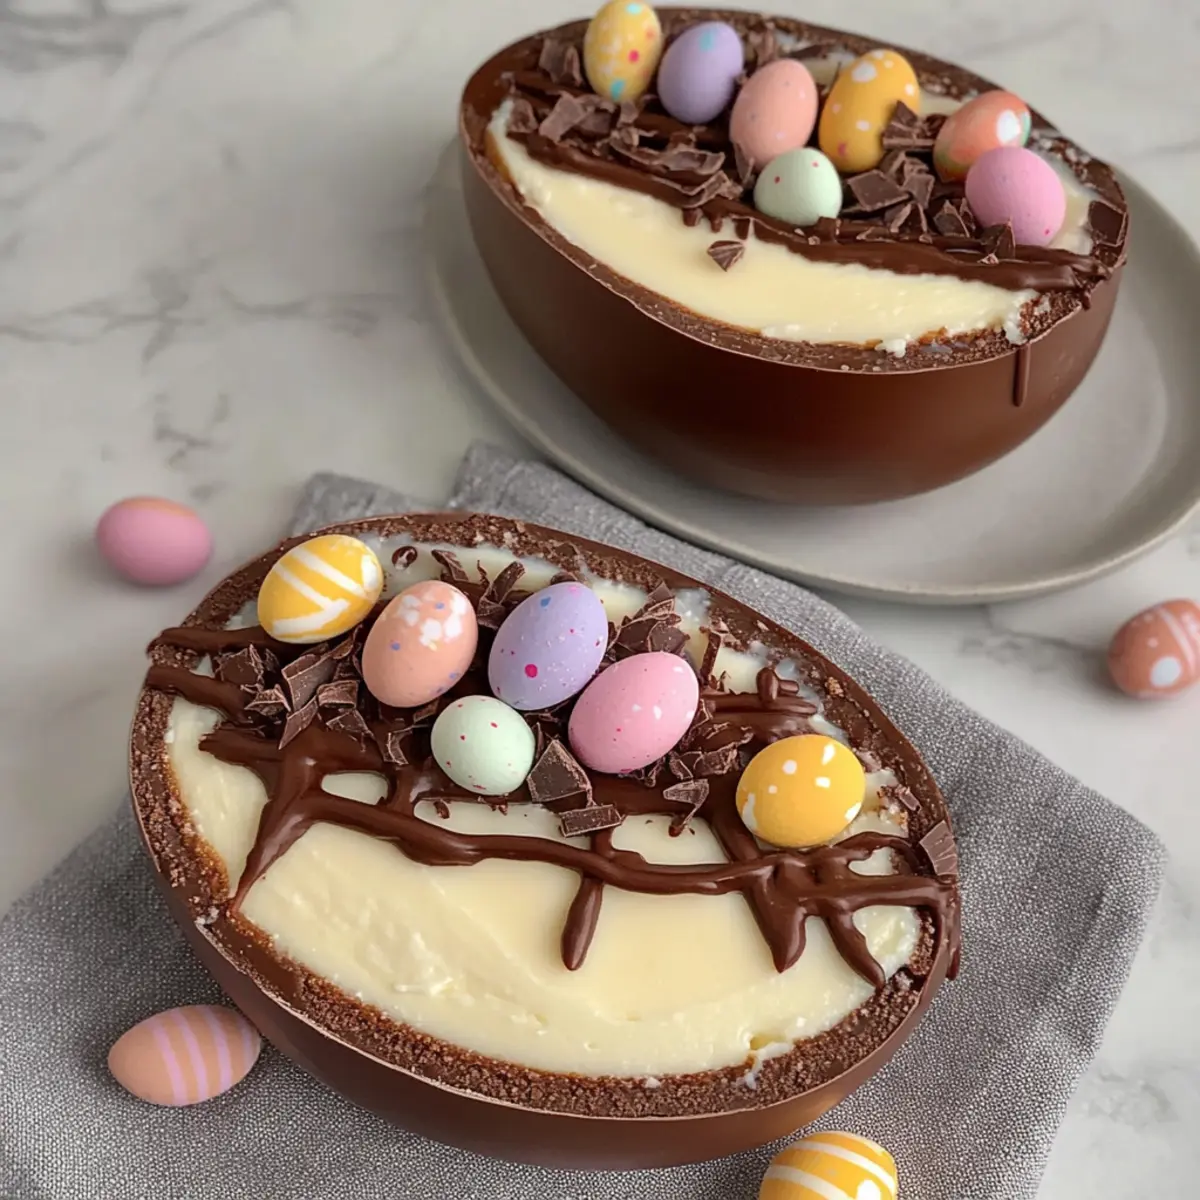
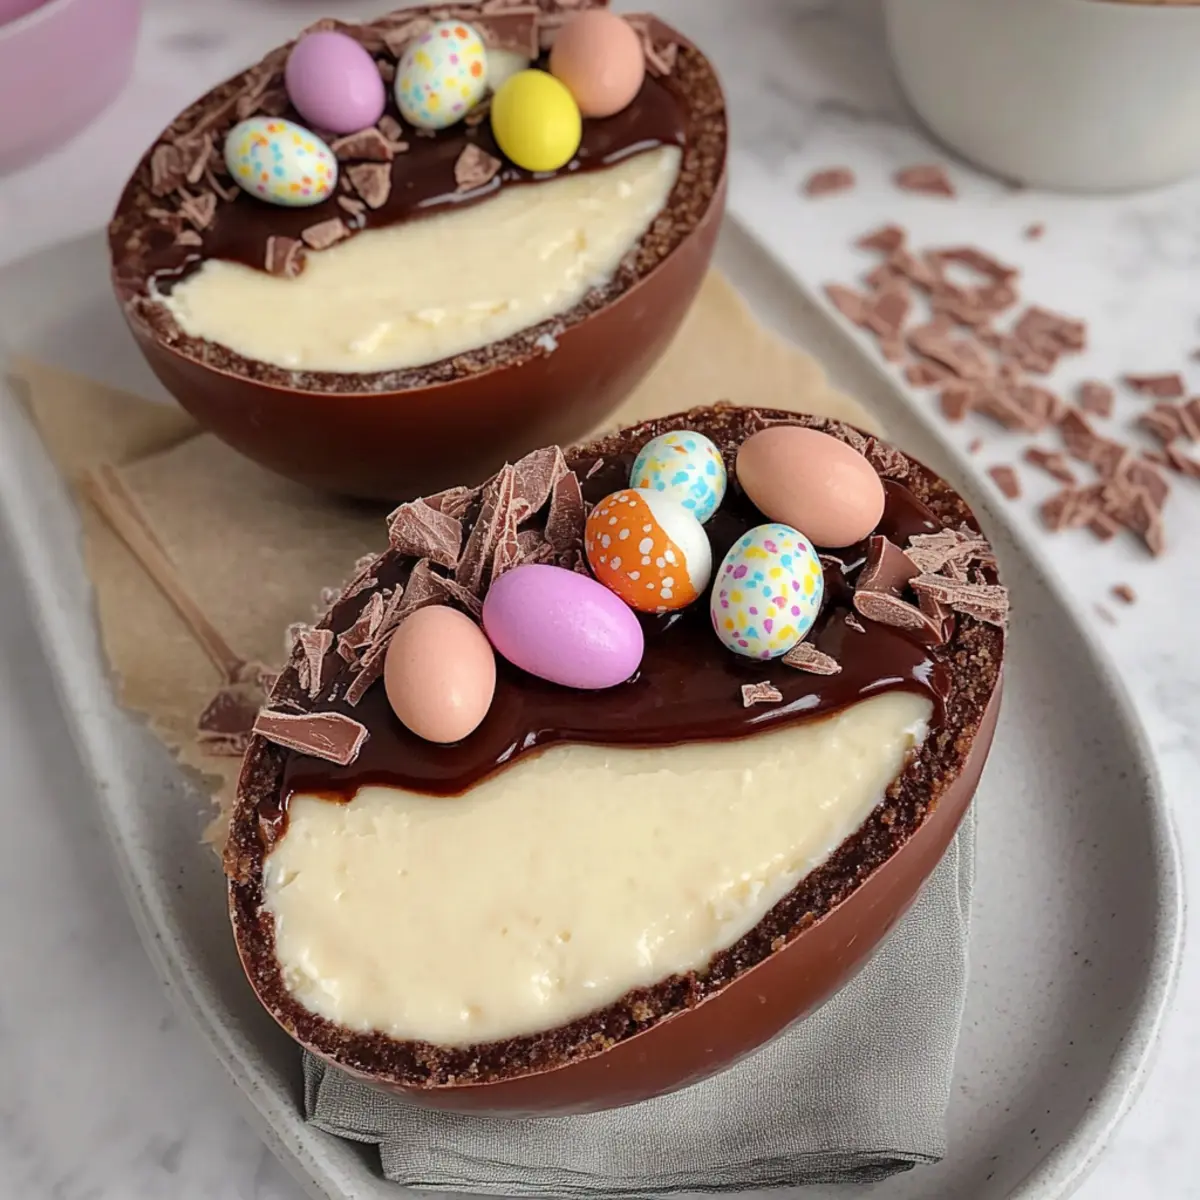
Once the filling has set, melt the dark chocolate in a microwave or over a double boiler. Drizzle the melted chocolate on top of the cheesecake filling for an elegant touch, then add mini eggs and Kit Kat bunnies or any other festive candies, creating a fun and vibrant decoration atop your Easter Egg Cheesecake.
Step 7: Serve/Store
Your beautiful Easter Egg Cheesecake is now ready to be served! Display it on a platter for guests to admire before slicing. If not served immediately, store the cheesecake in the fridge, where it will remain fresh for up to 3-4 days, perfect for enjoying throughout the Easter festivities.
Make Ahead Options
These No Bake Easter Egg Cheesecakes are a fantastic choice for meal prep, allowing you to save time during the bustling Easter celebration. You can prepare the biscuit base up to 24 hours in advance; simply crush and mix the biscuits with melted butter, then press them into the egg halves and refrigerate. The cheesecake filling can also be made the day before—just mix everything and fill the shells, smoothing the tops. Once assembled, chill them for at least 2 hours before serving, and they can be stored in the refrigerator for up to 3-4 days. To keep them fresh and delicious, cover them lightly with plastic wrap. Just drizzle the melted chocolate and add decorations before serving, and you’ll have a delightful dessert ready with minimal effort!
Expert Tips for Easter Egg Cheesecake
• Quality Ingredients Matter: Use high-quality cream cheese to ensure your filling is rich and creamy. This is key for a luscious Easter Egg Cheesecake.
• Right Egg Size: If your Easter egg is smaller, adjust the cheesecake mixture proportionally to fill it adequately, preventing overflow during chilling.
• Gluten-Free Swap: For a gluten-free version, double-check all ingredients and choose certified gluten-free biscuits to ensure safety.
• Decorate Creatively: While mini eggs and Kit Kat bunnies are fun, feel free to experiment with other seasonal candies or even edible flowers for a personal touch.
• Chill Time Is Essential: Allow the filling to set in the fridge for a full 2 hours. Rushing this step can result in a runny cheesecake.
What to Serve with No Bake Easter Egg Cheesecake?
Delight in the endless possibilities to elevate your Easter celebration and create a memorable feast!
-
Fresh Berries: Juicy strawberries or sweet raspberries add a burst of freshness that complements the creamy cheesecake beautifully. Their tartness balances the rich chocolate filling perfectly.
-
Vanilla Ice Cream: A classic pairing, a scoop of velvety vanilla ice cream enhances the dessert experience. The creaminess offers a lovely contrast to the smooth cheesecake texture.
-
Mint Chocolate Chip Cookies: The cool mint paired with chocolate delights your palate. These cookies can be a fun, nostalgic addition that invites everyone to indulge.
-
Creamy Fruit Salad: A light fruit salad featuring seasonal fruits like kiwi, pineapple, and oranges provides a refreshing touch to the meal. The bright flavors enhance the rich cheesecake.
-
Chocolate-Covered Strawberries: Elevate your dessert table with these playful treats. Their sweetness pairs wonderfully with the cheesecake, making each bite a delightful indulgence.
-
Sparkling Mint Lemonade: This refreshing drink adds a zesty kick to your meal, brightening up the flavors of your Easter Egg Cheesecake while keeping things light and festive.
-
Coffee or Espresso: A robust cup of coffee or a shot of espresso rounds off your feast perfectly. The bitterness contrasts nicely with the sweetness of the dessert, enhancing every flavor experience.
-
Mini Egg Truffles: Bring more fun to the table with these festive chocolate truffles made with mini eggs, echoing the spirit of the cheesecake while adding a playful touch.
Easter Egg Cheesecake Variations
Feel free to get creative and make this delightful Easter Egg Cheesecake your own with these fun twists!
-
White Chocolate: Swap out dark chocolate for white chocolate for a sweeter and creamier topping that your guests will adore. This will not only enhance the flavor but also brighten the appearance of your cheesecake.
-
Fruit Flavored Cream Cheese: Use strawberry or lemon cream cheese to give your cheesecake a fresh, fruity twist. This adds a zesty flavor that complements the chocolate beautifully, making each bite a burst of delight.
-
Gluten-Free Option: Simply replace the digestive biscuits with gluten-free crumbs. This ensures everyone can enjoy the dessert without worry. Just check the packaging to ensure they’re certified gluten-free!
-
Nutty Crunch: Add crushed nuts, like hazelnuts or pecans, to the biscuit base to introduce a delightful crunch. This added texture offers a satisfying contrast to the creamy filling.
-
Seasonal Candies: Instead of mini eggs, try decorating with chocolate-covered marshmallows or dried fruit for a unique look. You could even mix in festive sprinkles for a pop of color!
-
Boozy Version: For an adult twist, mix in a splash of flavored liqueur (like Baileys or Kahlua) into the cheesecake filling for added richness.
-
Layered Cheesecake: Fill the egg halves with alternating layers of cheesecake and fruit puree. The visual appeal of these layers is stunning, plus it adds an unexpected flavor burst.
No matter how you decide to customize, each variation promises to delight. If you’re still in the mood for other delightful treats, don’t forget to check out our irresistible Sugar Cookie Cheesecake or the satisfying Sausage Egg Breakfast for your next culinary adventure!
How to Store and Freeze Easter Egg Cheesecake
Fridge: Keep your Easter Egg Cheesecake in an airtight container for freshness. It can last for up to 3-4 days, maintaining its creamy goodness.
Freezer: If you’d like to extend storage, wrap the cheesecake halves tightly in plastic wrap and place them in a freezer-safe container. They can be frozen for up to 2 months.
Reheating: For best texture, thaw the cheesecake in the fridge overnight before serving. Avoid reheating, as this dessert is best served chilled.
Note: The Easter Egg Cheesecake maintains its delightful taste and texture for several days when stored properly, so feel free to prepare it in advance!
No Bake Easter Egg Cheesecake Recipe FAQs
What kind of chocolate Easter egg should I use?
Absolutely! For the best structure and flavor, use a high-quality large chocolate egg (approximately 150g). Ensure it’s sturdy enough to hold the cheesecake filling without cracking; a slightly thicker shell often works better, especially if you’re looking to decorate!
How should I store leftover Easter Egg Cheesecake?
To keep your delicious Easter Egg Cheesecake fresh, store any leftovers in an airtight container in the fridge for up to 3-4 days. If stored properly, it maintains its smooth and creamy texture, making it just as delightful on day four!
Can I freeze the Easter Egg Cheesecake?
Yes, you can! For optimal freezing, wrap the cheesecake halves tightly in plastic wrap, then place them in a freezer-safe container. This no-bake cheesecake can be frozen for up to 2 months. When ready to enjoy, simply thaw the cheesecake in the refrigerator overnight. Avoid re-freezing after thawing for best results!
What if my cheesecake filling doesn’t thicken properly?
If your filling isn’t thickening as desired, make sure to fold the double cream in gently but thoroughly. It takes around 3-5 minutes of mixing to achieve the right consistency. If it’s still too runny, consider adding more icing sugar or a tablespoon of cream cheese to help stabilize it.
Is this Easter Egg Cheesecake suitable for people with allergies?
Yes and no. This recipe is vegetarian and can be made gluten-free with the right cookie alternative. However, it contains dairy (cream cheese and double cream), so make sure to substitute these ingredients if you have lactose intolerance or any allergies. Plant-based cream cheese and coconut cream can work splendidly as alternatives.
Irresistible Easter Egg Cheesecake That’ll Wow Your Guests
Ingredients
Equipment
Method
- Warming a sharp knife under hot water, then drying it. Carefully slice the large Easter egg in half along its seam, ensuring smooth, even cuts. Set the egg shells aside.
- Crush the digestive biscuits into fine crumbs, either using a food processor or placing them in a plastic bag and smashing them with a rolling pin. Combine biscuit crumbs with melted butter until the mixture resembles wet sand.
- Press the buttery biscuit mixture evenly into the bottom of the Easter egg halves. Place the egg halves in the refrigerator for about 30 minutes.
- In a large bowl, beat together the cream cheese, icing sugar, and vanilla extract until smooth. Fold in the double cream, mixing until thickens slightly (3-5 minutes).
- Spoon the filling into the chilled egg halves, spreading it evenly. Return to the fridge for at least 2 hours to set.
- Melt the dark chocolate in a microwave or over a double boiler. Drizzle the melted chocolate on top of the filling and add decorations.
- Serve on a platter for guests to admire. Store in the fridge for up to 3-4 days if not served immediately.
Leave a Reply