
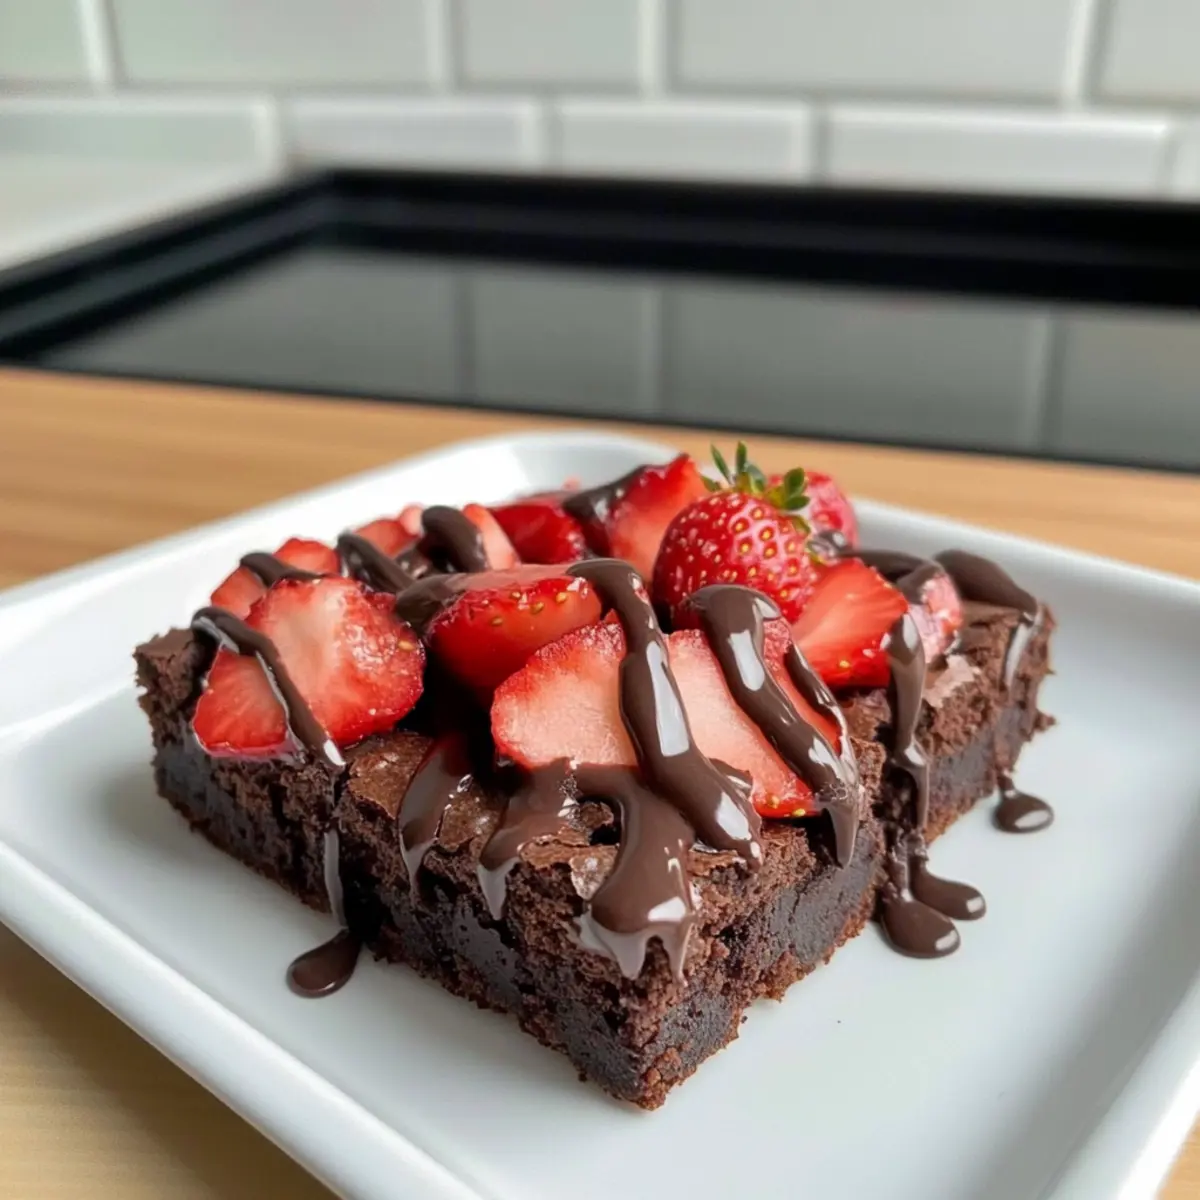
As I watched the sun dip below the horizon, the craving for something sweet began to swirl in my mind. That’s when I decided to whip up a batch of my irresistible Chocolate Covered Strawberry Brownies. The beauty of these brownies lies in their simplicity; using a boxed mix makes them a breeze to prepare, even for novice bakers. Topped with ripe strawberries and a drizzle of melted chocolate, they’re the perfect blend of rich and refreshing. Not only are they sure to impress at any gathering, but they also satisfy that nagging sweet tooth without requiring hours in the kitchen. Whether it’s a special occasion or just a cozy night in, these brownies are ready to become your go-to dessert. Ready to create a treat that will leave your friends and family begging for more? Let’s dive into this delicious recipe!
Why are these brownies a must-try?
Simplicity at Its Best: The use of a boxed brownie mix means that you can whip these up even if you’re a beginner baker.
Gourmet Appeal: Topped with fresh strawberries and a luscious chocolate drizzle, they look and taste like a lavish dessert you’d find in a bakery.
Perfect for Any Occasion: Whether it’s a birthday celebration or a movie night, these brownies will always be a hit and a conversation starter.
Endless Customization: Feel free to swap strawberries with other berries or add nuts for added crunch, making this recipe versatile for various tastes.
Quick Cool Down: While they do need a little time to set after drizzling, you can easily prepare them ahead, saving you time during your event.
Ideal for Sharing: Slice them into squares and serve them at parties to ensure everyone gets a taste of sweetness—perfect alongside a refreshing Strawberry Spinach Salad.
Chocolate Covered Strawberry Brownies Ingredients
For the Brownies
• Brownie Mix – This boxed mix provides the perfect fudgy texture for your brownies.
• Vegetable Oil – Ensures a smooth chocolate coating; substitute with coconut oil for a unique flavor.
For the Toppings
• Chopped Strawberries – Use ripe strawberries for a burst of freshness and natural sweetness.
• Semi-Sweet Chocolate Chips – Creates a rich drizzle on top; dark chocolate can be used for a richer flavor.
These ingredients come together to create the delightful Chocolate Covered Strawberry Brownies that will surely impress!
Step‑by‑Step Instructions for Chocolate Covered Strawberry Brownies
Step 1: Prepare the Brownies
Begin by preheating your oven to 350°F (175°C). In a mixing bowl, combine the boxed brownie mix with the required ingredients as instructed on the package, usually water, eggs, and vegetable oil. Stir until the mixture is smooth and well blended, with no dry spots visible. Pour the batter into a greased 9×13-inch baking pan and bake for 20–25 minutes, or until a toothpick comes out with only a few moist crumbs.
Step 2: Cool the Brownies
Once the brownies are baked, remove them from the oven and let them cool in the pan for about 10 minutes. Then, transfer them to a wire rack to cool completely for at least 30 minutes. This step is crucial, as a warm brownie can cause the toppings to lose their texture when added. Ensure they are completely cool before moving on to the next step to keep strawberries firm.
Step 3: Prepare the Strawberries
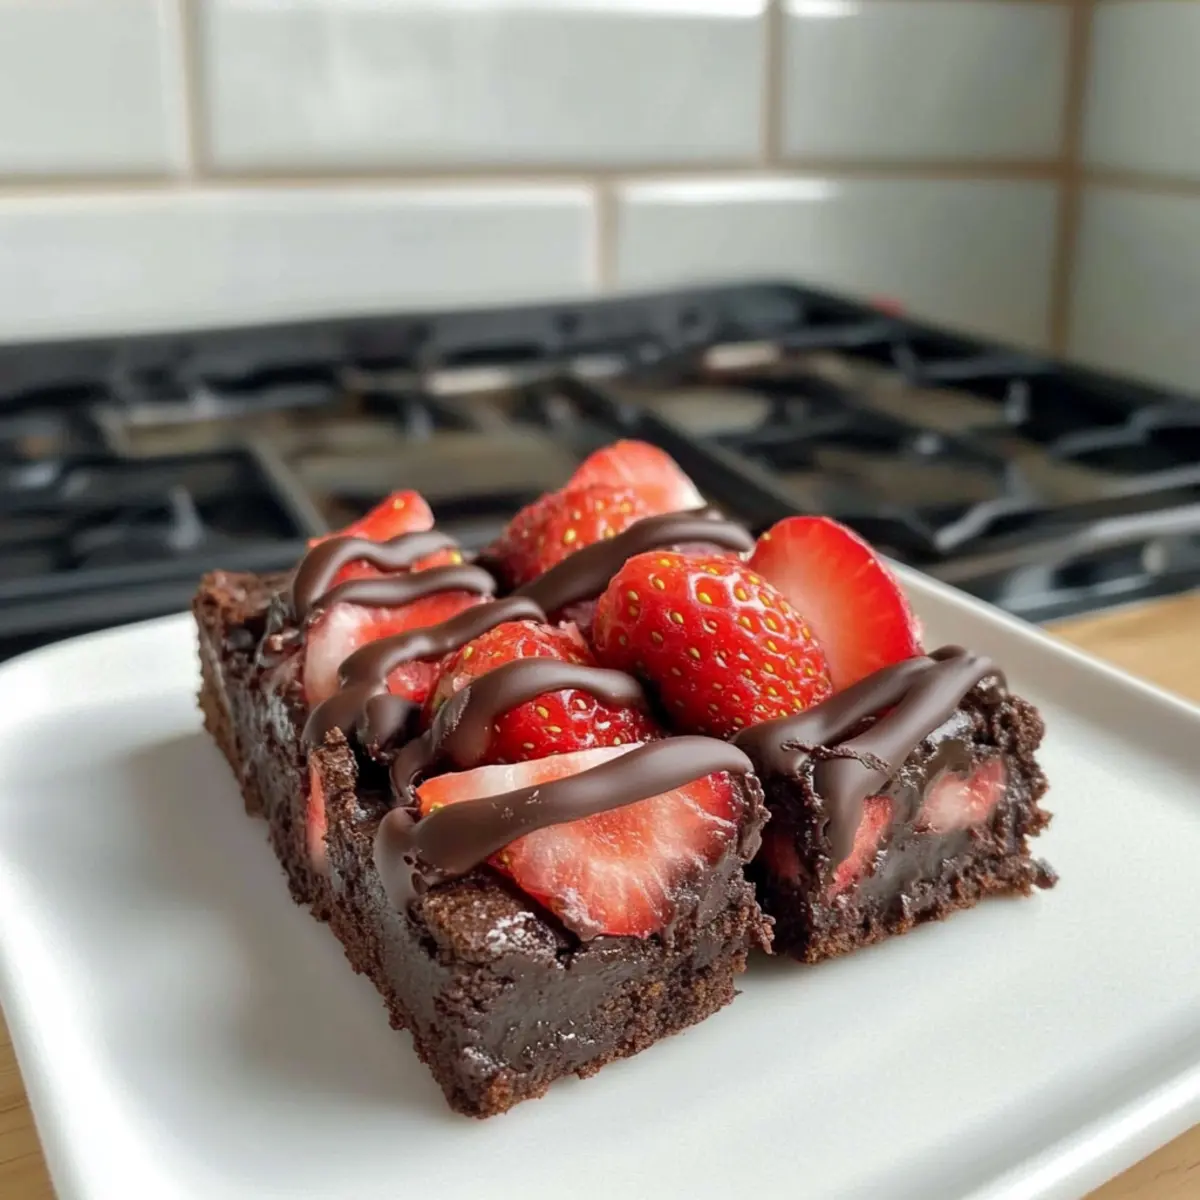
While the brownies cool, wash and dry 1 to 2 cups of ripe strawberries thoroughly. Remove the green tops and chop them into bite-sized pieces for easy serving. Once your brownies are completely cooled, evenly distribute the chopped strawberries on top, gently pressing them into the brownie surface to secure them. Their vibrant color will transform your Chocolate Covered Strawberry Brownies into a visual delight.
Step 4: Melt the Chocolate
In a microwave-safe bowl, combine 1 cup of semi-sweet chocolate chips with 2 teaspoons of vegetable oil for a smooth drizzle. Heat in the microwave in 30-second intervals, stirring between each interval until melted and silky—this usually takes about 1 to 2 minutes total. Be cautious not to overheat the chocolate as it can seize. Once melted, you’re ready to give your brownies that irresistible glaze.
Step 5: Drizzle the Chocolate
Transfer your melted chocolate into a ziplock bag. Snip off a small corner of the bag to create a piping bag. Gently drizzle the melted chocolate over the strawberries in a zigzag motion for an appealing finish. The chocolate should flow easily if properly melted. Make sure to cover the strawberries generously; this gives your Chocolate Covered Strawberry Brownies a decadent touch.
Step 6: Set the Brownies
Now that your brownies are beautifully drizzled, place them in the refrigerator for about 30 minutes to 1 hour. This chilling time will allow the chocolate to harden and set properly. To achieve the best results, check periodically to ensure the drizzle has solidified before cutting. Once set, you’ll have a sweet treat that’s as visually appealing as it is delicious.
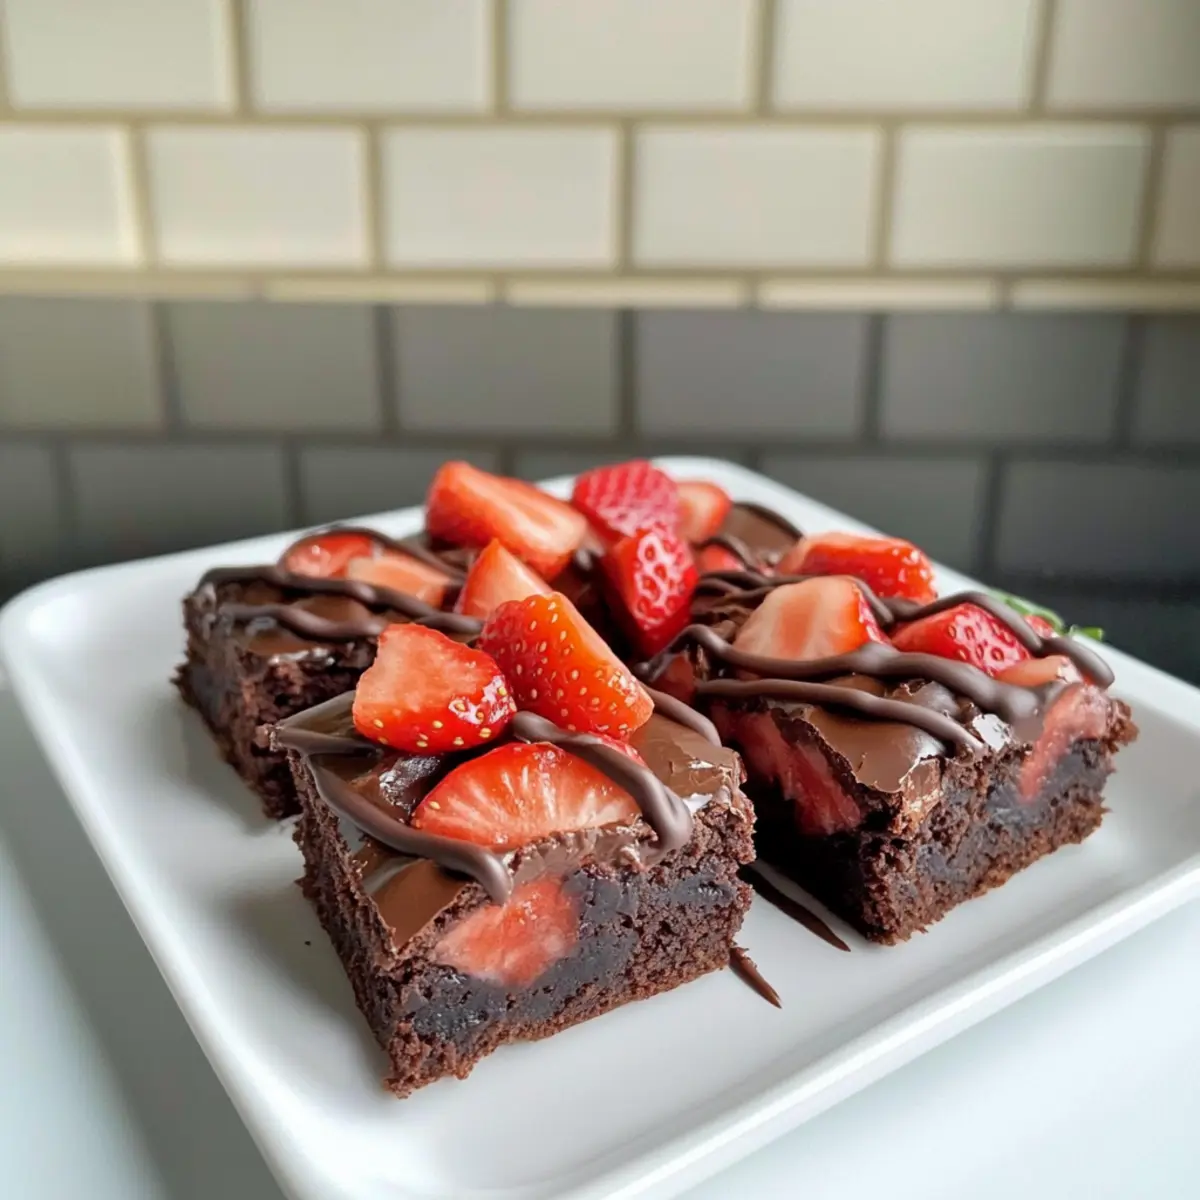
Step 7: Slice and Serve
After the chocolate has fully set, use a sharp knife to slice the brownies into squares, avoiding any tearing of the layers. Serve them on a platter to showcase their enticing look. These Chocolate Covered Strawberry Brownies are perfect for sharing at parties, celebrations, or even a cozy movie night in, making them a delightful treat for any occasion!

What to Serve with Irresistible Chocolate Covered Strawberry Brownies
Imagine delighting your loved ones with a well-rounded meal that perfectly complements these decadent brownies.
- Vanilla Ice Cream: The creamy, cool texture of vanilla ice cream balances the richness of the brownies, creating a comforting dessert experience. Pile a scoop atop a warm brownie for a delightful contrast!
- Fresh Fruit Salad: A vibrant mix of seasonal fruits adds a refreshing touch that cuts through the fudginess. The bright flavors bring a lightness that enhances the overall meal.
- Coffee or Espresso: A rich cup of coffee or cappuccino beautifully contrasts with the sweet notes of the brownies, enhancing their chocolate flavor. The warmth of the drink makes for a cozy pairing.
- Whipped Cream Topping: Light and airy, whipped cream adds a luscious, dreamy layer to the brownies. Drizzle some over each square for that extra special touch at gatherings.
- Mint Chocolate Chip Milkshake: The cool, minty flavors of this shake not only satisfy cravings but also elevate the chocolatey intensity of the brownies. Perfect for a fun dessert combo!
- Cheesecake Bites: Mini cheesecake bites offer a tangy contrast to the rich brownies. Their bite-sized nature makes them easy to enjoy and share alongside your sweet treat!
- Sparkling Strawberry Lemonade: This bubbly drink pairs the tartness of lemonade with sweet strawberries, providing a refreshing drink option that complements the brownies beautifully.
- Chocolate-Dipped Pretzels: Add a delightful crunch and salty contrast with chocolate-dipped pretzels. They make for a fun and easy-to-make snack alongside the brownies!
- Almond Biscotti: For a crunchy, nutty touch, serve almond biscotti on the side. The delightful crunch and flavor elevate the overall dessert experience while being perfect for dipping!
Storage Tips for Chocolate Covered Strawberry Brownies
Fridge: Store your brownies in an airtight container in the refrigerator for up to 3 days to maintain freshness and prevent drying out.
Make-Ahead: You can prepare the brownies a day in advance; just wait to add the strawberries and chocolate drizzle until you’re ready to serve for the best flavor and presentation.
Freezer: For longer storage, freeze brownies in a freezer-safe container for up to 2 months. Thaw overnight in the fridge before serving.
Reheating: If you prefer warm brownies, gently microwave individual squares for about 10-15 seconds. Enjoy them fresh for a delightful experience!
Chocolate Covered Strawberry Brownies Variations
Feel free to personalize your brownies and make them your own; the options are deliciously endless!
-
Berry Medley: Swap chopped strawberries for raspberries or blueberries for a refreshing twist. Mixing berries adds vibrant color and unique flavors!
-
Nutty Crunch: Add a half-cup of your favorite chopped nuts to the brownie mix. This will introduce a delightful crunch and depth to your brownies!
-
Chocolate Ganache: For chocolate lovers, replace the melted chocolate drizzle with rich chocolate ganache. Just melt chocolate with cream for an indulgent finish.
-
Caramel Drizzle: Add a layer of smooth caramel sauce over the strawberries before drizzling with chocolate. This creates a heavenly sweet and salty contrast.
-
Minty Fresh: Incorporate peppermint extract into the brownie batter for a refreshing minty flavor that pairs beautifully with the chocolate and strawberries.
-
Spiced Delight: Toss in a pinch of cinnamon or cayenne pepper for an unexpected kick. These spices can warm up the flavors, making for a unique brownie experience!
-
Vegan Option: Use a vegan brownie mix and substitute the oil with applesauce. This makes your Chocolate Covered Strawberry Brownies plant-based and just as fudge-like.
Ready to explore even more sweet adventures in the kitchen? Try my White Chocolate Orange for a refreshing treat or go rich with Double Chocolate Chip delights! Happy baking!
Make Ahead Options
These Chocolate Covered Strawberry Brownies are a dream for busy home cooks looking to save time! You can prepare the brownies up to 24 hours in advance, allowing them to cool completely before topping. Simply bake them, cool, and store in an airtight container in the refrigerator. You can chop the strawberries up to 3 days ahead and keep them refrigerated separately to maintain their freshness. On the day you plan to serve, simply add the chopped strawberries and drizzle the melted chocolate over the top just before serving to ensure the chocolate sets beautifully. This make-ahead strategy means you can create a stunning dessert with minimal effort right when you need it!
Expert Tips for Chocolate Covered Strawberry Brownies
-
Cool Time: Ensure your brownies are completely cool before adding toppings. Warm brownies can make strawberries mushy and ruin the final texture.
-
Chocolate Melting: Melt chocolate gradually in the microwave, stirring frequently. Overheating can cause the chocolate to seize; patience is key for a smooth drizzle.
-
Zigzag Drizzle: To achieve an elegant finish, practice a zigzag motion while drizzling chocolate. This technique adds a gourmet touch to your Chocolate Covered Strawberry Brownies.
-
Sharp Knife: Use a sharp knife to slice the brownies after the chocolate has set. This helps create clean, beautiful squares without tearing any layers.
-
Berry Variations: Feel free to swap strawberries with your favorite berries. Raspberries or blueberries can add exciting flavors and colors to your brownies!
-
Storage Essentials: Keep brownies stored in an airtight container in the fridge for freshness. They taste best within three days, but trust me, they won’t last that long!
Chocolate Covered Strawberry Brownies Recipe FAQs
What type of brownie mix should I use?
You can use any 18 oz boxed brownie mix for this recipe. However, I recommend a fudgy brownie mix as it pairs beautifully with the strawberries and chocolate topping, creating a rich texture that enhances the overall experience.
How should I store my brownies after making them?
Store your Chocolate Covered Strawberry Brownies in an airtight container in the refrigerator for up to 3 days. This helps maintain their freshness and prevents them from drying out. Just be sure to keep them refrigerated, as the strawberries can spoil if left out too long.
Can I freeze Chocolate Covered Strawberry Brownies?
Absolutely! To freeze, wrap the brownies tightly in plastic wrap and then place them in a freezer-safe container. They can be stored for up to 2 months. When you’re ready to enjoy them, simply thaw overnight in the fridge. If you want a warm treat, pop individual squares in the microwave for about 10–15 seconds.
What should I do if my melted chocolate seizes?
If your melted chocolate seizes and becomes grainy, don’t fret! You can sometimes salvage it by adding a teaspoon of vegetable oil and gently reheating it in the microwave, stirring frequently until smooth. Always melt chocolate gradually and avoid high heat for the best results.
Can I use different toppings for these brownies?
Of course! You can easily swap chopped strawberries for other berries like raspberries or blueberries for a delicious twist. You can also add chopped nuts or use chocolate ganache instead of the chocolate drizzle for an indulgent upgrade. The more the merrier when it comes to toppings!
Are these brownies safe for my pets or any allergies?
No, Chocolate Covered Strawberry Brownies contain chocolate, which is toxic to pets. If you have any allergies among your guests, be mindful of the ingredients you choose, particularly regarding gluten in standard brownie mixes and the potential for nut allergies if you use nut toppings. Always double-check those ingredient labels!
Ultimate Chocolate Covered Strawberry Brownies You’ll Love
Ingredients
Equipment
Method
- Preheat your oven to 350°F (175°C). In a mixing bowl, combine the boxed brownie mix with the required ingredients as instructed on the package. Stir until smooth and well blended. Pour the batter into a greased 9x13-inch baking pan and bake for 20–25 minutes, or until a toothpick comes out with only a few moist crumbs.
- Remove the brownies from the oven and let them cool in the pan for about 10 minutes. Transfer to a wire rack to cool completely for at least 30 minutes.
- Wash and dry 1 to 2 cups of ripe strawberries thoroughly. Remove the green tops and chop them into bite-sized pieces. Once brownies are cooled, evenly distribute the strawberries on top.
- Combine 1 cup of semi-sweet chocolate chips with 2 teaspoons of vegetable oil in a microwave-safe bowl. Heat in the microwave in 30-second intervals, stirring between each until melted and silky.
- Transfer melted chocolate into a ziplock bag. Snip off a small corner and drizzle the chocolate over the strawberries in a zigzag motion.
- Place the brownies in the refrigerator for 30 minutes to 1 hour to allow the chocolate to harden.
- Use a sharp knife to slice the brownies into squares. Serve on a platter.
Leave a Reply